Umrah is a sacred Islamic pilgrimage to Makkah, offering a profound spiritual experience. This guide provides essential insights, rituals, and preparations for a meaningful Umrah journey.
What is Umrah?
Umrah, often referred to as the “minor pilgrimage,” is a sacred Islamic ritual performed in Makkah. It involves key acts of worship, including donning Ihram, Tawaf (circumambulating the Kaaba), Saee (running between Safa and Marwa), and Halq or Qasr. Unlike Hajj, Umrah can be performed at any time of the year and is a voluntary act of devotion. It is a spiritual journey that strengthens faith, seeks Allah’s blessings, and rejuvenates the soul through adherence to its sacred rituals and intentions.
Importance of Umrah in Islam
Umrah holds significant religious and spiritual value in Islam, emphasizing devotion, purification, and seeking Allah’s mercy. It is a Sunnah of the Prophet Muhammad (peace be upon him) and reflects a deep connection to the holy city of Makkah. Performing Umrah is believed to wash away sins, bring spiritual rejuvenation, and grant divine blessings. It also fosters unity among Muslims, reaffirming faith and humility. Umrah’s voluntary nature makes it an act of worship that strengthens one’s relationship with Allah, offering a path to spiritual growth and inner peace.
Preparation and Intentions
Preparation for Umrah involves making a sincere intention, donning Ihram at Meeqat, and reciting Talbiyah. Ensure physical and spiritual readiness for this sacred journey.
How to Make Intention for Umrah
Making the intention for Umrah is a vital step. It should be done sincerely and with the heart’s purest devotion; The intention is verbalized by saying, “O Allah, I intend to perform Umrah.” This declaration marks the beginning of the sacred state of Ihram. It is essential to focus on the purpose and seek Allah’s blessings throughout the journey. A clear intention ensures the rituals are performed with mindfulness and faith, enhancing the spiritual experience.
Essential Preparations Before Leaving
Before departing for Umrah, ensure thorough physical, financial, and spiritual readiness. Pack essentials like Ihram attire, prayer mat, Quran, and toiletries. Complete all necessary vaccinations and carry medications. Organize documents such as passport, visa, and travel insurance. Maintain a healthy diet and mental preparedness. Familiarize yourself with Umrah rituals and supplications. Seek blessings from family and loved ones, and avoid any acts that may invalidate your Ihram. Proper preparation enhances the spiritual experience and ensures a smooth journey.
The Rituals of Umrah
The rituals of Umrah form the heart of this sacred pilgrimage, comprising Ihram, Tawaf, Saee, and Halq or Qasr, each holding deep spiritual significance and guiding the pilgrim closer to Allah.
Ihram: The Sacred State
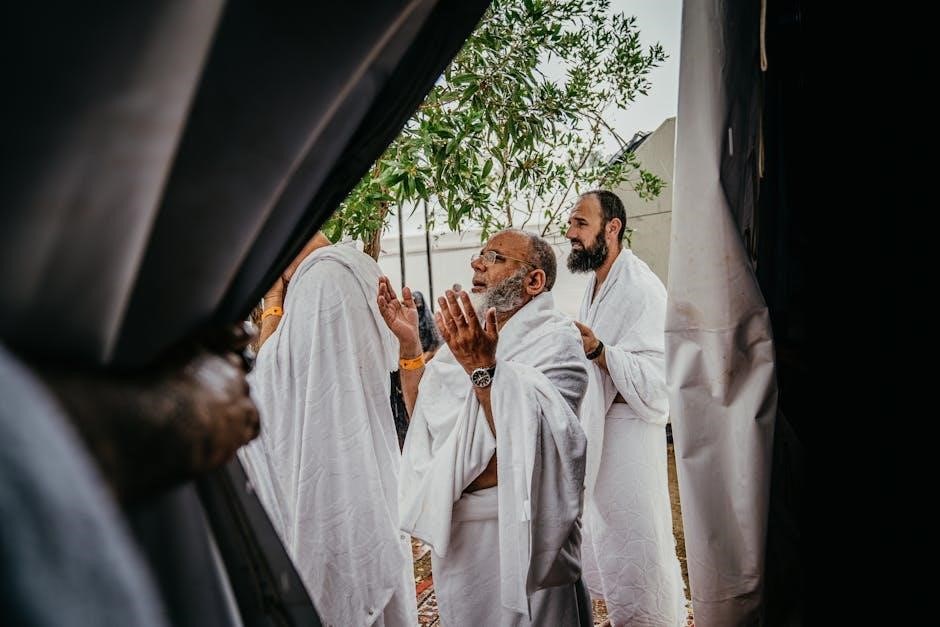
Ihram is the sacred state pilgrims enter before performing Umrah, involving specific attire and intentions. Men wear two seamless cloths, while women dress modestly in their usual attire. Before donning Ihram, pilgrims must perform Ghusl (ritual bath), trim nails, and remove unwanted hair. Ihram signifies detachment from worldly desires and dedication to worship. Upon entering this state, pilgrims recite the Talbiyah, declaring their readiness to respond to Allah’s call. This ritual marks the beginning of their spiritual journey toward Makkah.
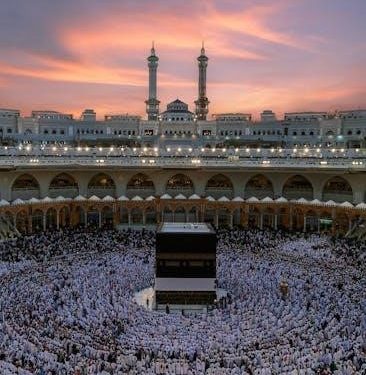
Tawaf: Circumambulating the Kaaba
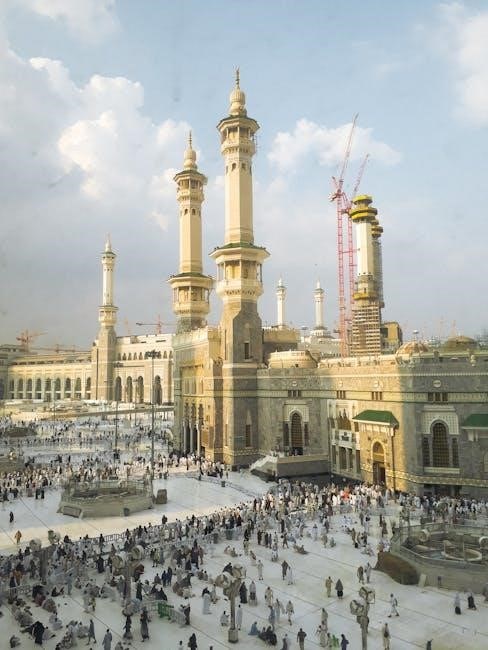
Tawaf is a central ritual of Umrah, involving seven counterclockwise circuits around the Kaaba. Pilgrims begin at the Black Stone, kissing or touching it if possible. Each circuit represents a spiritual connection to Allah, reflecting devotion and humility. Men are advised to perform the first three circuits with a brisk pace (Raml), while women maintain a normal walk. Supplications and recitation of the Quran are encouraged during Tawaf to enhance the spiritual experience and seek divine blessings.
Saee: Running Between Safa and Marwa
Saee is a vital Umrah ritual, symbolizing Hagar’s search for water. Pilgrims walk or run between the hills of Safa and Marwa seven times, starting from Safa. Each round involves specific supplications and reflections, emphasizing trust in Allah. Men may briskly walk during the first three circuits, while women maintain a steady pace. The ritual culminates at Marwa, completing the spiritual journey and emulating Hagar’s devotion, fostering humility and gratitude.
Halq or Qasr: Completing the Rituals
Halq or Qasr marks the final step of Umrah, where pilgrims exit Ihram by shaving or trimming their hair. Men must shave their entire head or trim it short, while women only trim a small portion. This act symbolizes liberation from worldly bonds and completes the Umrah rituals, allowing pilgrims to resume normal activities. It is a moment of relief and gratitude, signifying the fulfillment of one’s sacred duties in the presence of Allah.
Meeqat and Ihram
Meeqat marks the boundary where pilgrims enter Ihram, a sacred state requiring intention, specific attire, and adherence to rituals, preparing them for Umrah’s spiritual journey.
Understanding Meeqat Points
Meeqat points are designated boundaries outside Makkah where pilgrims enter the sacred state of Ihram. These points, established by the Prophet (peace be upon him), mark the starting area for Umrah rituals. Pilgrims must don Ihram before crossing these points, ensuring they are spiritually and physically prepared. Each region has specific Meeqat points, making it accessible for pilgrims worldwide to begin their journey. Understanding these points is crucial for adhering to Islamic guidelines and performing Umrah correctly.
Donning Ihram and Reciting Talbiyah
Donning Ihram involves wearing sacred garments and reciting the Talbiyah prayer. Men wear a two-piece white cloth, while women wear modest attire. Pilgrims enter Ihram at Meeqat points, marking their spiritual commitment. The Talbiyah, recited loudly by men and quietly by women, expresses submission to Allah. The phrase “Labbaik, Allahumma Labbaik” (Here I am, O Allah, here I am) signifies readiness to fulfill the sacred rites of Umrah, embodying humility and devotion.

Supplications and Prayers
Essential supplications and prayers, such as Talbiyah and specific Duas, are integral to Umrah. These prayers enhance spiritual connection and adherence to Islamic traditions during the pilgrimage.
Reciting Talbiyah Loudly
Reciting Talbiyah is a central supplication in Umrah, expressing submission to Allah; Men recite it loudly, while women recite it quietly, upon donning Ihram and entering sacred areas. This practice strengthens spiritual focus and devotion, reminding pilgrims of their purpose and connection to Allah. Talbiyah is repeated consistently until the first Tawaf begins, fostering a deep sense of mindfulness and humility throughout the journey.
Essential Duas During Umrah
Reciting essential duas during Umrah enhances the spiritual experience. Key supplications include the Talbiyah, which is recited upon donning Ihram, and specific prayers during Tawaf and Saee. Pilgrims are encouraged to invoke blessings and seek forgiveness, especially while circumambulating the Kaaba. Duas during these rituals strengthen the connection with Allah, fostering a deeper sense of humility and devotion. Memorizing these supplications ensures a meaningful and enriching Umrah journey.
A Step-by-Step Guide
Enter Ihram, perform Tawaf around the Kaaba, complete Saee between Safa and Marwa, and finalize with Halq or Qasr, ensuring all rituals are done with sincerity and devotion.
Entering the Haram and Starting Umrah
Upon arriving at the Holy Mosque in Makkah, enter through the King Fahad Gate with respect and humility. Make a heartfelt intention to begin Umrah, seeking Allah’s blessings. Proceed to the Kaaba, ensuring Ihram is worn and Talbiyah is recited. Approach the Black Stone, place your right hand on it, and kiss it if possible. Begin Tawaf counterclockwise, maintaining focus and sincerity. Remember to supplicate during this sacred moment, asking Allah for forgiveness and guidance.
Performing Tawaf and Saee
Begin Tawaf by facing the Black Stone, raise your hands, and recite the Takbir. Circle the Kaaba seven times counterclockwise, supplicating during each lap. After Tawaf, proceed to the Station of Ibrahim for a two-rak’ah prayer. Next, perform Saee by running between Safa and Marwa seven times, starting at Safa. Emulate Hagar’s search for water, expressing gratitude and faith. Complete the ritual with Halq or Qasr, ensuring all steps align with Islamic traditions for a spiritually enriching experience.
Completing the Rituals and Exiting Ihram
After performing Tawaf and Saee, complete your Umrah with Halq (shaving the head) or Qasr (trimming hair). Men should shave completely, while women trim a small portion. This act symbolizes liberation from worldly bonds. Finally, make a concluding supplication, expressing gratitude and seeking Allah’s acceptance. Exiting Ihram allows the resumption of normal activities, marking the successful completion of Umrah. Ensure all rituals are performed with sincerity and adherence to Islamic guidelines for a spiritually fulfilling experience.
Travel and Practical Tips
Plan meticulously, pack lightly, and prioritize health. Carry essentials like Ihram, toiletries, and medications. Stay hydrated and organized for a smooth, spiritually enriching Umrah experience.
Planning Your Umrah Journey
Plan meticulously by choosing the right time, budgeting costs, and booking flights and accommodations in advance. Ensure visa requirements are met, and health guidelines are followed. Pack essentials like Ihram attire, toiletries, and medications. Research Meeqat points and rituals to avoid last-minute confusion. Stay informed about weather conditions and crowd management. A well-planned journey ensures a smooth and spiritually fulfilling Umrah experience.
Packing Essentials for Umrah
Packing wisely ensures comfort and convenience during your Umrah journey. Include Ihram attire, prayer mat, ablution necessities, and toiletries. Carry a water bottle, comfortable shoes, and lightweight clothing. Bring essential documents like your passport, visa, and travel insurance. Include a small Quran, dua book, and medications. Pack snacks for energy and a reusable bag for souvenirs. Ensure all items comply with airline regulations and cultural norms for a hassle-free experience.
Health and Safety Tips
Ensure vaccinations and health screenings are up-to-date before traveling; Wear a mask in crowded areas to prevent illness. Stay hydrated, especially during Tawaf and Saee, to avoid dehydration. Rest when needed to maintain energy levels. Be cautious in crowded spaces to prevent accidents or lost belongings. Follow COVID-19 protocols and local health guidelines. Carry a first-aid kit and essential medications. Stay informed about emergency services and hospital locations in Makkah. Prioritize your health to fully enjoy the spiritual experience of Umrah.
Downloading and Using the Umrah Guide PDF
The Umrah Guide PDF is a comprehensive resource offering step-by-step rituals, essential supplications, and visual guides. Download it for free and carry it as a handy reference during your pilgrimage journey.
Where to Find the Umrah Guide PDF
The Umrah Guide PDF can be easily downloaded from various online sources. Websites like mtg.mykajabi.com and Islamic travel agencies offer free PDF downloads. Additionally, platforms like Google Drive and social media groups share these guides. You can also find it on forums and websites dedicated to Islamic pilgrimage resources. Simply search for “Umrah Guide PDF” or “Step-by-Step Umrah Guide” to access reliable sources. Ensure to download from trusted platforms for accurate information.
How to Use the Guide Effectively
Start by reviewing the Umrah Guide PDF thoroughly before your journey. Follow the step-by-step instructions for rituals like Ihram, Tawaf, and Saee. Pay attention to supplications and prayers included in the guide. Use the visual aids and diagrams to better understand each step. Refer to the guide during your pilgrimage to ensure you complete all rituals correctly. Utilize the practical tips for packing, health, and safety to enhance your experience. By following the guide closely, you can perform Umrah with confidence and devotion.
Umrah is a transformative experience, fostering spiritual growth and connection with Islamic heritage. Perform it with sincerity, seeking divine blessings, and let its essence remain with you forever.
The Significance of Umrah
Umrah holds profound spiritual significance, offering a unique opportunity for Muslims to strengthen their faith and seek divine forgiveness. It mirrors the rituals of Hajj, symbolizing obedience to Allah and connection to Islamic heritage. Performing Umrah fosters self-reflection, humility, and gratitude, while its acts of worship—such as Tawaf and Saee—reinforce the pilgrimage’s deep religious and historical importance. This sacred journey allows believers to rejuvenate their souls and draw closer to Allah, seeking His mercy and blessings.
Final Tips for a Blessed Umrah Experience
To ensure a blessed Umrah, maintain a positive mindset, stay punctual with prayers, and utilize your time wisely in Makkah. Seek blessings at sacred sites like the Kaaba and Zamzam Well. Avoid distractions, focus on worship, and reflect on your journey. Keep the spirit of Umrah alive by sharing its lessons and staying committed to faith; May Allah accept your Umrah and grant you His mercy and guidance.
Amen.