
Welcome to our comprehensive guide on RV wiring! This section covers the basics of RV electrical systems, safety tips, and essential tools for maintaining and upgrading your setup efficiently.
Understanding the Basics of RV Electrical Systems
An RV electrical system operates on two primary voltages: 12V DC and 120V AC. The 12V system, powered by the RV battery, runs essential functions like lighting and appliances when off-grid. The 120V system, typically powered by a generator or external hookup, supports heavier appliances such as microwaves and air conditioning. Both systems work together to provide power wherever you go. Understanding these systems is crucial for safe and efficient operation. Always ensure power is off at the source before performing electrical work. Use tools with non-conductive handles and treat all wires as live. Familiarizing yourself with circuit breakers, fuses, and connectors will help you maintain and troubleshoot your RVs electrical setup effectively. This knowledge ensures a safe and enjoyable camping experience.

RV Electrical System Basics
RV electrical systems combine 12V DC and 120V AC power to support lighting, appliances, and comfort features. Proper setup ensures functionality and safety during travel and camping.
Overview of 12V and 120V Systems
An RV electrical system operates on two primary voltages: 12V DC and 120V AC. The 12V system, powered by batteries, runs essential functions like lighting, appliances, and water pumps, even when disconnected from external power. This system is crucial for off-grid camping. The 120V system, powered by shore power or a generator, supports high-power devices like air conditioners, microwaves, and hair dryers. Understanding these systems is vital for safety and functionality. Proper wiring ensures both systems work seamlessly together, providing reliable power for all RV needs. Always follow safety guidelines when working with electricity to avoid hazards. This balanced setup makes modern RV living comfortable and convenient, whether on the road or at a campsite.
How RV Electrical Systems Work Together
RV electrical systems integrate 12V and 120V components to provide a reliable power supply. The 12V system, powered by batteries, charges via solar, generator, or shore power, ensuring off-grid functionality. This system powers lights, pumps, and electronics. The 120V system, activated by shore power or generator, handles high-draw appliances like AC units and microwaves. A converter/charger transforms 120V to 12V for battery charging. Transfer switches automatically switch power sources, ensuring seamless operation. Circuit breakers protect against overloads. Both systems work together to meet all RV power needs, whether boondocking or connected to utilities. Proper coordination ensures safety, efficiency, and continuous power supply for a comfortable RV experience. Understanding this integration is key to maintaining and troubleshooting electrical systems effectively.

Color-Coded Wiring Standards
Color-coded wiring is crucial for RV electrical safety and ease of use. It helps identify live, ground, and neutral wires, reducing confusion and ensuring consistency across manufacturers.
Keystone RV’s Exclusive Color-Coding System
Keystone RV has developed an exclusive color-coding system to simplify wiring identification and maintenance. This system uses distinct colors for specific functions, such as power, ground, and accessory wires, ensuring clarity and safety. Unlike standard systems, Keystone’s approach assigns unique hues to critical circuits, reducing confusion during repairs or upgrades. For instance, their proprietary colors for 12V and 120V systems help differentiate between low and high voltage lines. Additionally, Keystone’s system includes color-coded connectors and labels, making it easier for DIYers and professionals alike to trace wires and diagnose issues. This exclusive approach enhances safety, reduces errors, and streamlines the wiring process, setting Keystone apart in the RV industry. Their innovative color-coding is a testament to their commitment to user-friendly designs and reliable electrical systems.
How to Identify and Trace Wires Using Color Codes
Identifying and tracing wires using color codes is a straightforward process that enhances safety and efficiency. Begin by referencing the wiring diagram specific to your RV model, as it provides a key to the color-coding system. Start by locating the main electrical panel or circuit breaker, where wires originate. Use the color chart to determine the function of each wire, such as power, ground, or accessory lines. For tracing, follow the wire’s path through the RV, noting connectors and junctions. If unsure, use a multimeter or test light to verify voltage or continuity. Always turn off power before working on wires. This method ensures accurate identification and minimizes the risk of electrical mishaps. Patience and attention to detail are key to successfully tracing RV wiring systems.

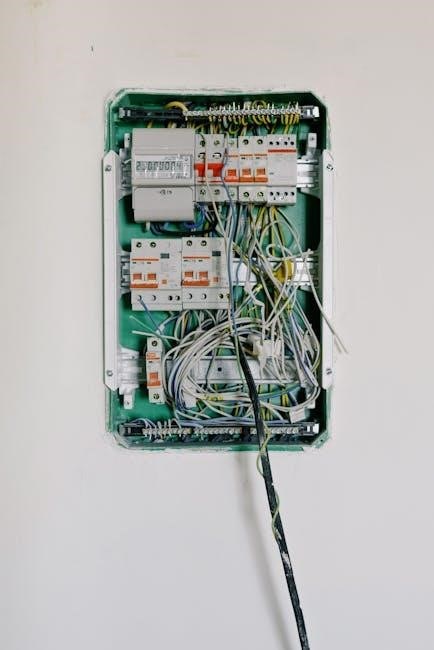
RV Wiring Diagrams
RV wiring diagrams are essential tools for understanding and working with electrical systems. They provide a visual layout of connections, circuits, and components, simplifying installation, troubleshooting, and repairs. These diagrams are crucial for identifying wire paths, connectors, and power sources, ensuring safe and accurate electrical work. They are indispensable for RV owners and technicians alike, offering a clear guide to maintaining and upgrading electrical systems effectively.
Types of Wiring Diagrams for RVs
RV wiring diagrams come in several types, each serving a specific purpose. Circuit diagrams detail the flow of electricity through components, while wiring harness diagrams show the physical layout of wires and connectors. Connector diagrams focus on the plugs and sockets used for connections, and schematic diagrams provide a simplified view of complex systems. Additionally, trailer wiring diagrams outline the hookups for tow vehicles, and system-specific diagrams focus on individual areas like plumbing, HVAC, or solar setups. These diagrams help users identify components, trace wiring issues, and perform repairs safely and efficiently. Understanding the differences between these diagrams is key to effectively working with RV electrical systems.
How to Read and Interpret RV Wiring Diagrams
To effectively read and interpret RV wiring diagrams, start by identifying the key components and symbols used. Locate the legend or key provided with the diagram to understand the meaning of each symbol, color code, and line representation. Begin by tracing the main power source and follow the flow of electricity through circuits. Pay attention to connectors, switches, and fuses, as they indicate where power is directed or interrupted. Use the diagram to identify wire colors and their corresponding functions, ensuring connections match the intended system. Always verify the diagram against the actual RV setup to confirm accuracy. If unsure, consult a multimeter to test connections and voltage. Practice interpreting diagrams to gain confidence in troubleshooting and repairing RV electrical systems.

Trailer Wiring Connectors
Trailer wiring connectors, including 4-pin, 5-pin, 6-pin, and 7-pin, connect RVs to vehicles, enabling essential functions like lighting, brakes, and auxiliary power for safe and reliable towing.
7-Pin Trailer Wiring Explained
The 7-pin trailer wiring connector is the most common type used for RVs and trailers, providing essential connections for lighting, brakes, and auxiliary power. Each pin serves a specific function: left turn signal, right turn signal, brake lights, tail lights, 12V power, auxiliary power, and ground. This setup ensures reliable communication between the tow vehicle and the trailer. The 7-pin connector is mandatory for trailers with electric brakes, as it powers the braking system. Its durability and weather-resistant design make it ideal for heavy-duty towing. Understanding the functions of each pin is crucial for safe and proper hookup, ensuring all systems operate efficiently during travel.
How to Hook Up Your 7-Way Trailer Plug
Hooking up a 7-way trailer plug requires careful attention to ensure proper connections. Start by aligning the plug with the socket, ensuring it is fully seated and clicked into place. Match the pins according to their functions: left turn signal (yellow), right turn signal (green), brake lights (blue), tail lights (brown), 12V power (red), auxiliary power (black), and ground (white). Test all lights and brakes to confirm functionality. Use a tester or have someone assist to verify signals. Finally, secure the connector with a dust cover when not in use to protect it from the elements. Always follow manufacturer guidelines for your specific RV or trailer setup.
RV Electrical Safety Tips
Always turn off power before working on wiring. Use a multimeter to check circuit voltage. Install GFCI outlets near water sources. Regularly inspect cords for damage or wear. Never overload circuits. Ensure proper grounding to prevent shocks. Keep flammable materials away from electrical components. Test circuit breakers monthly. Use surge protectors for RV hookups. Avoid DIY repairs without proper knowledge. Store cords in a dry, cool place. Follow manufacturer guidelines for all electrical systems. Stay informed about electrical safety standards for RVs.
Essential Safety Precautions for RV Wiring
When working on RV wiring, always plan your project carefully to avoid accidents. Turn off the main power supply and verify voltage with a multimeter before starting. Avoid working in wet conditions or near water sources to prevent electrical shocks. Ensure proper ventilation to prevent overheating of components. Use correctly rated wires and connectors to handle the intended current. Keep flammable materials away from electrical systems. Install smoke detectors and carbon monoxide alarms for early warning. Regularly inspect wiring for signs of wear, fraying, or damage. Never overload circuits, as this can cause fires. Store electrical tools and materials in a dry, secure location. Always refer to your RV’s manual for specific guidelines. Use a fire extinguisher rated for electrical fires and keep it accessible. Stay informed about local electrical codes and regulations for RVs.
Common Mistakes to Avoid in RV Electrical Work
One of the most common mistakes in RV electrical work is using household wiring materials, which are not designed for the unique demands of RV systems. Another error is ignoring proper grounding, which can lead to safety hazards and malfunctions. Overloading circuits by adding too many high-power appliances is a frequent issue, risking electrical fires. Mixing 12V and 120V systems without proper separation can cause irreversible damage. Forgetting to turn off the main power supply before starting work is a dangerous oversight. Using incorrect wire gauges or connectors can result in poor connections and potential fires. Additionally, neglecting to test the system after repairs can leave hidden issues unresolved. Always avoid cutting corners on materials or rushing the job, as this can lead to long-term problems.

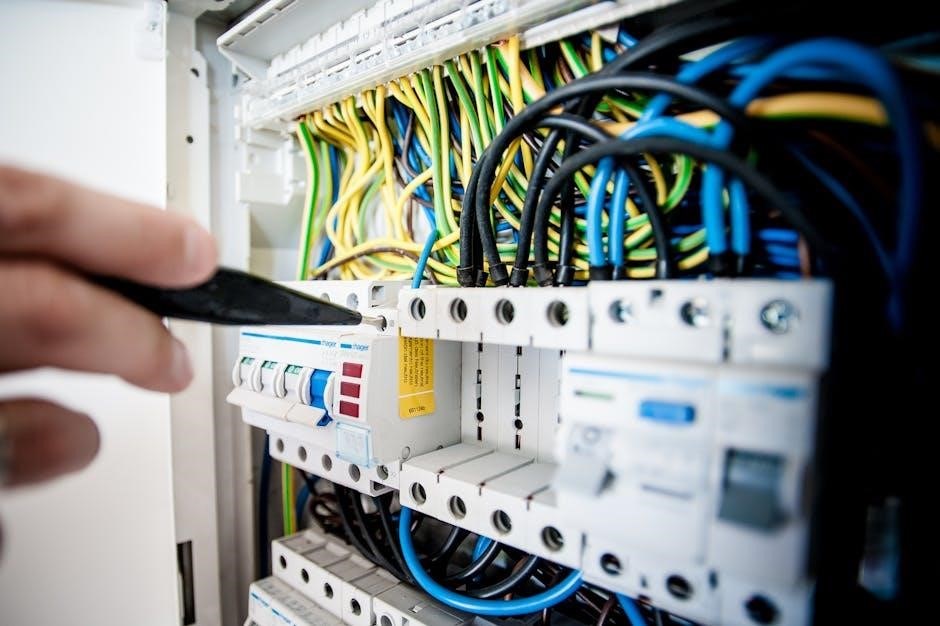
Tools and Materials Needed
Essential tools include multimeters, wire strippers, and crimpers. Materials like 12V and 120V wires, connectors, fuses, and circuit breakers are crucial for safe and reliable RV wiring projects.
Essential Tools for RV Wiring Projects
When tackling RV wiring projects, having the right tools is crucial for safety and efficiency. A multimeter is essential for measuring voltage, current, and resistance, helping diagnose electrical issues. Wire strippers and crimpers are necessary for preparing and connecting wires securely. Pliers and screwdrivers (both flathead and Phillips) are handy for tightening connections and accessing components. A circuit tester or voltage tester ensures circuits are live or safe to work on. Wire connectors and terminals are vital for making reliable connections. Additionally, a heat gun for shrinking heat shrink tubing and a wire harness kit can be useful for organizing cables. These tools help ensure safe, professional-grade wiring work in your RV.
Recommended Materials for Safe and Durable Wiring
For safe and durable RV wiring, use high-quality materials designed for automotive and marine applications. 12V and 120V-rated wires are essential, with THHN (thermoplastic-insulated) wire being ideal for 120V systems due to its heat resistance. For 12V systems, stranded copper wire is recommended for flexibility. Heat-shrink tubing and adhesive-lined connectors ensure secure, water-resistant connections. Fuse holders and circuit breakers protect against overloads. Wire loom or flex tubing shields wires from abrasion. Use marine-grade connectors for outdoor or wet areas. Ring terminals and spade connectors provide reliable battery and component connections. Always opt for UL-rated materials to meet safety standards. Proper materials ensure longevity and safety in your RV’s electrical system.

Troubleshooting RV Electrical Issues
Troubleshooting RV electrical issues involves identifying faulty components, checking connections, and testing circuits. Use multimeters and diagnostic tools to locate problems. Always ensure safety first.
Common Electrical Problems in RVs
Common electrical problems in RVs include blown fuses, tripped circuit breakers, and dead batteries. Overloaded circuits from excessive power usage often cause these issues. Faulty wiring connections, corroded terminals, and damaged cords can lead to intermittent power loss. Dead outlets or malfunctioning lights may indicate faulty wiring or GFCI tripping. Battery drain issues arise from parasitic loads or faulty charge systems. Incorrect shore power connections can damage entire systems. Regular inspections and proper maintenance are crucial to prevent these issues. Always check for loose connections and corrosion in plugs and receptacles. Addressing these problems early prevents system-wide electrical failures and ensures safe, reliable power distribution throughout the RV.
Step-by-Step Guide to Diagnosing and Fixing Issues
When diagnosing RV electrical issues, start by identifying symptoms like flickering lights or dead outlets. Check the circuit breaker or fuse box to see if a circuit has tripped or a fuse has blown. Use a multimeter to test voltage at outlets and wiring connections. Inspect wires for damage, corrosion, or loose connections. Consult the RV wiring diagram to trace circuits and identify potential fault points. For battery issues, test voltage and charge levels, ensuring proper connections. Replace faulty components or tighten loose connections as needed. Always disconnect power sources before making repairs. If unsure, consult a professional to avoid further damage or safety risks. Systematic troubleshooting ensures efficient resolution of electrical problems.
External Resources for Further Learning
Explore official RV manufacturer websites, forums like RVillage, and YouTube channels for detailed guides. Refer to wiring diagrams in service manuals for specific models. RV forums, YouTube tutorials, and wiring manuals are invaluable for advanced learning and troubleshooting. These resources provide hands-on examples and expert advice for mastering RV electrical systems.
Recommended Guides and Videos for RV Wiring
For in-depth learning, seek out RV manufacturer websites and official wiring guides. Websites like RVillage and iRV2 offer forums where experienced RVers share tips. YouTube channels like RV Repair & Maintenance provide step-by-step tutorials. Official service manuals from brands like Keystone and Forest River include detailed diagrams. Platforms like Amazon and eBay offer third-party guides tailored to specific RV models. These resources are perfect for understanding complex systems and troubleshooting common issues. Always prioritize guides from trusted sources to ensure accuracy and safety. Combining hands-on practice with these resources will enhance your RV wiring skills significantly.
Where to Find Detailed RV Wiring Schematics
Detailed RV wiring schematics can be found through various reliable sources. Start with the manufacturer’s official website, as most brands provide downloadable PDF manuals specific to your RV model. Forums like RVillage and iRV2 often host user-shared diagrams and schematics. Local RV dealerships may also provide access to wiring diagrams, especially for maintenance purposes. Additionally, YouTube channels dedicated to RV repairs frequently link to detailed schematics in their video descriptions. For older models, RV repair shops or specialty stores may offer custom diagrams. Platforms like Amazon and eBay sell third-party wiring guides tailored to specific RVs. Always ensure the schematics match your RV’s make and model for accuracy and safety.